Peri-Implant Surgery
[An Example of OralPedia.org entry]
Incisions and Flaps in Periodontal and Peri-Implant Surgery
Felipe Bravo, Bruna de C. F. Vajgel, Estela S. Gusmão and Renata Cimões
Pós-Graduação em Odontologia Universidade Federal de Pernambuco, Brasil.
The principles of periodontal surgery, in general, do not differ from the surgical principles applied to other parts of the body. In order to perform a successful surgical procedure there are several important aspects to consider, namely: gentle tissue manipulation; firm and precise incisions; careful retraction of the flap; use of a traumatic suture techniques, and promotion of stable wound healing. Well-planned incisions are essential to gain access to the surgical site. When planning the incision, the main considerations must be the anatomy, surgical goal, and the design and a traumatic management of the flap. It is worth emphasizing the importance of a well-sharpened cutting instrument, in order to prevent unnecessary tissue damage. Clean and defined incisions will lead to better healing and less discomfort to the patient. [1]
Contents
- 1 The Evolution of Periodontal Surgery
- 2 External Bevel
- 3 Internal Bevel
- 4 Sulcular Incision
- 5 Relaxing Incision
- 6 Incision for Reducing Thickness
- 7 Contra-incision
- 8 Relaxing Incision in the Periosteum
- 9 Flaps Used for better Visualization and Cleaning of Periodontal Pockets
- 10 Neumann Flap
- 11 Kirkland Flap (Modified Flap)
- 12 Modified Widman Flap
- 13 Flap for Preservation of Papillae
- 14 Apically Positioned Flap
- 15 Full-thickness Flap
- 16 Partial-thickness Flap
- 17 References
1 The Evolution of Periodontal Surgery
Surgical techniques for curing periodontal disease have been described in reports over many years. In the majority of instances, the techniques caused mutilations and burns in the periodontal tissues. See Table 1. With changes in the concept of periodontal disease and increasing dissatisfaction with the mutilations produced by the surgical technique, leading to compromised aesthetics, changes changes were proposed in the flaps described up until then, with the purpose of minimizing these problems.
Table 1. Main types of incisions
INCISION |
DESCRIPTION |
INDICATION |
INSTRUMENTS |
|---|---|---|---|
EXTERNAL BEVEL |
Performed in the coronal direction |
Gingivectomy; clinical crown augmentation; gingivoplasty; gingival growth |
Kirkland gingivectomy knife; or banging ivectomy knife; blades 11D; blades 15; 360 degrees, Laser gingivectomy |
INTERNAL BEVEL (reverse or inverted bevel) |
Performed in the apical direction, made on the crest of the gingival margin, or 0.5 to 2.0 mm away from the margin |
Excisional procedures for new insertion; modified Widman flap; clinical crown augmentation; gingival augmentation |
Blades 11,12 or 12B, 15 or 15C |
SULCULAR (of the sulcus) |
Performed in the apical direction, madein the sulcus and performed in the direction of the alveolar crest |
Procedures for preservation of the papillae; esthetic are as; are as with little kerati- nized tissue; guided tissue regeneration procedures (GTR) |
Blades 11,12 or 12B, 15 or 15C |
RELAXING (vertical) |
Perpendicular to the gingival margin at the angles of transition of the teeth |
Increase access to allow the flap to be positioned towards the coronal or apical region |
Blades 11,12 or 12B, 15 or 15C |
FOR THINNING |
Increase access to allow the flap to be positioned towards the coronal or apical region |
Palatal flaps; distal wedge procedures; gingivectomy with internal bevel; voluminous papillae |
Blades 11,12 or 12B, 15 or 15C |
CONTRAINCISION |
Small incision made in the relaxing incision, and directed towards the base of the flap |
Laterally positioned pediculated flaps |
Blades 11, 15 or 15C |
RELAXING INCISION IN THE PERIOSTEUM |
Incision at the base of the flap, cutting the subjacent periosteum |
To release the tension on the flap, allowing it to advance in the coronal direction |
Blades 11, 15 or 15C |
Table 2. Evolution of periodontal surgeries.[2]
| BRIEF HISTORY OF THE EVOLUTION,OF PERIODONTAL SURGERIES | |
|---|---|
460-377 AC |
Hippocrates proposed the “use of a piece of red hot iron applied to the gingiva to eliminate the problem” |
38 AC |
Celso indicated “cauterization and incision for cases of gangrene of the gingiva” |
MIDDLE AGES |
Albucasis wrote that “a piece of red hot iron must be kept on the site until the individual feel sheat in the roots of the teeth” |
1746 |
Fauchard “used to use scissors to cut off gingival excesses and growths” |
1884 |
Salomon Robicsek idealized “radical gingivectomy with bone exposure” |
1950 |
Goldman “showed concern about the physiological contour of the gingiva and did not expose bone tissue” |
2 External Bevel
This is an incision contained in the gingiva and directed toward the crown of the tooth, with the object of eliminating pockets, improving gingival contour, and gaining access to the roots. This type of incision is frequently used in conjunction with flap surgeries when it is necessary to thin the tissue externally. It must be performed before folding the flap1. This incision is highly prevalent when performing gingivectomy surgeries [3-8].
2.1 Technique
The incision is contained in the gingiva and made in the direction toward the crown of the tooth. The instrument is placed at an angle of 45 degrees in the direction toward the pocket or gingival sulcus, or in relation to the root of the tooth. It may be linear or it may outline the gingival parabola (Figure 1). In the external bevel incision, the angle is 45 degrees in relation to the root.
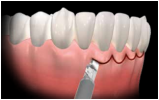
Figure 1.A. Linear external bevelincision (A)
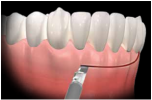
Figure 1.B. External bevelincision outlining the shape of the gingiva (B)
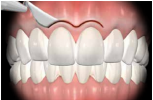
Figure 1.C. External bevelincision made with Kirkland gingivectomy knife (C)
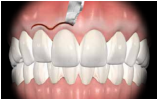
Figure 1.D. External bevelincision made with a scalpel blade (D)


3 Internal Bevel
This is a basic incision for the majority of flap procedures in periodontics, which is the primary incision when performing many flap procedures [1, 6]. The aim of this internal bevel decision is to remove the epithelium from the pocket to provide direct contact between the bone and healthy connective tissue [1]. Presently, this is done with three important objectives: to remove the pocket lining, to preserve the uninvolved external surface of the gingiva, and to produce a thin, fine gingival margin for bone-to-tooth adaptation [6]. This type of incision is also denominated the inverted or reverse bevel.
3.1 Technique
One begins at a certain distance from the gingival margin and ends at the bone crest; the inclination of the incision is inverse to the incision for gingivectomy, as it is made at an angle of 45 degrees in relation to the crown. The blade is placed parallel to the long axis of the tooth in the apical direction toward the alveolar crest, and is placed on the crest of the margin, or 0.5 to 2.0 mm away from it. The contour is dictated by the anatomy of the tooth and shape of the root (Figure 2).


Figure 2. Internal bevel incision showing the distance away from the gingival margin. The incision is angulated in the direction of the alveolar crest (A, B); front view of the internal bevel incision (C).
4 Sulcular Incision
This incision is performed when one wishes to preserve all the existent keratinized tissue [1]. It may also be denominated the secondary incision [6].
4.1 Technique
The scalpel blade is inserted into the gingival sulcus, parallel to the long axis of the tooth, in the direction toward the alveolar crest. This technique requires the inclusion of the largest possible amount of papillaein the flap (Figure 3).


Figure 3. Side view of an intrasulcular incision, showing that the incision is directed into the gingival sulcus (A, B); front view of the intrasulcular incision (C); intrasulcular incision in the palatal region (D).
5 Relaxing Incision
This type of incision may also be denominated the vertical or oblique relaxing incision. Relaxing incisions must extend beyond the mucogingival line in order to allow the flap to be displaced, and they should be avoided in the lingual and palatal areas [6]. They are made perpendicular to the gingival margin, increasing access to the alveolar bone, in addition to diminishing the tension of flaps. They also allow apical and coronal positioning of flaps, and limit the inclusion of a healthy site in the surgical field. Furthermore, relaxing incisions must not be made in pronounced concavities, must not divide the interdental papillae, and must not be located in the middle portion of the teeth (Figure 4).


Figure 4. Relaxing incisions. Incorrect location of the relaxing incision (A-C); correct location of the relaxing incision (D-F).
5.1 Technique
Incisions are made with the scalpel in the perpendicular position, and may or may not include the papillae in the flap. The incision must not cross the prominence of the adjacent tooth root (Figure 5).


Figure 5. Unilateral relaxing incisions (A, B); bilateral relaxing incision (C); positioning the scalpel blade to perform relaxing incisions (D).
6 Incision for Reducing Thickness
These incisions reduce the volume of connective tissue in the flap and are used to reduce the thickness of tissues. They are frequently used in interproximal wedge surgeries and for the reduction of voluminous papillae [1] (Figure 6)

Figure 6. Incision for removing connective tissue.
7 Contra-incision
These are small incisions made on the apical surface of vertical relaxing incisions. Contra-incisions are used in conjunction with pediculated flaps to promote greater mobility. They must not exceed 2 to 3 mm in length, so that the blood supply is not compromised [1]. This type of incision was described by Corn in 1964 (Figure 7).

Figure 7. Contraincision to favor greater flap mobility.
8 Relaxing Incision in the Periosteum
Relaxing incisions in the periosteum are used to advance the flap, either in the coronal or lateral direction, thereby allowing positioning of the flap without tension. The scalpel blade faces the flap, cutting the subjacent periosteum1 (Figure 8).


Figure 8. Mucoperiosteal flap (A); incision in the periosteum to increase flap mobility (B).
9 Flaps Used for better Visualization and Cleaning of Periodontal Pockets
9.1 Widman Flap
Widman [10] was one of the first researchers to describe a surgical technique for eliminating periodontal pockets. The author described a mucoperiosteal flap designed to remove the epithelium and the inflamed connective tissue from the pocket, in addition to facilitating correct cleaning of the root surface.
9.2 Technique
Two relaxing incisions are performed to delimit the surgical area. One incision is made accompanying the gingival margin contour, separating the epithelium from the pockets in the non-inflamed gingiva. The flap is displaced, exposing around 2 to 3 mm of alveolar bone (Figure 9). After this, the inflamed tissue is removed with curettes, and the alveolar bone is scaled and re-anatomized (Figure 10). The flap is repositioned and kept in place with interproximal sutures (Figure 11).


Figure 9. Relaxing incision in the Widman flap (A); lifting the flap, and then removing the collar of inflamed tissue (B).

Figure 10. Bone recontouring after removing inflamed tissue.

Figure 11. Flap sutured with the gingival margin located at bone crest level.
10 Neumann Flap
A few years after Widman [10], Neumann [11] described a technique for treatment with flaps, but this differs little from techniques previously proposed, although the main objective was still to facilitate correct cleaning of the root surface.
10.1 Technique
An intrasulcular incision is made, outlining the affected teeth in the direction of the apical portions of the pockets, and separating the mucoperiosteal flap. Both are delimited by relaxing incisions.
After this, the internal surface is curetted to remove the epithelium from the pocket and the granulation tissue. The root surface is scaled and planed, and bone irregularities are removed. The flap is repositioned following adjustments to ensure ideal flap adaptation.
11 Kirkland Flap (Modified Flap)
This procedure was idealized in 1931 by Kirkland [12], who was concerned about the esthetic harm done by scar retraction, and was proposed to be a more conservative technique that was very similar to the surgery proposed by Neumann. He called the technique modified flap surgery, and developed a series of instruments for use in this technique. The purpose of the flap was to gain access and to enable adequate root debridement, without relaxing incisions and without the need for removing gingival tissue, thus causing few changes in the anterior region, as there were no relaxing incisions and no gingival tissue removal.
11.1 Technique
Intrasulcular incisions are made up to the bottom of the pocket, both on the vestibular and lingual surfaces. The incisions were extended in the mesial and distal directions (Figure 12).
The flap is detached to expose the root surfaces for debridement. If there are angular bone defects, they must be curetted (Figure 13).
Granulation tissues and the epithelium of the pocket are eliminated from the internal surface of the flap. The flap is repositioned with interproximal sutures (Figure 14).

Figure 12. Intrasulcular incision for the Kirkland flap.

Figure 13. Displacement of the gingiva for visualization of the root surface.


Figure 14. Mechanical debridement of the root surfaces (A); the flap is repositioned in the original position and sutured (B).
12 Modified Widman Flap
In 1974, Ramfjord and Nissle [13] described the modified Widman flap. This techniqueis recognized as the “open flap curettage technique”, and was inspired bythe techniques proposed by Widman (1920) [10], Neumann (1920) [11] and Kirkland (1931) [12]. It consists of open field curettage with the purpose of gaining attachment. The characteristics of the technique are that it facilitates correct root surface cleaning, however, without performing apical and bone contour displacement, in order to preserve the gingival height of the flap. [13]
12.1 Technique
For this technique it is necessary to perform incisions in three directions (Figure15).
The first incision is made at a distance of more or less 1 mm from the gingivalmargin and parallel to the long axis of the tooth (Figure 16).
The full thickness of the flap is carefully displaced. The second incision, which is intrasulcular, is made around the teeth up to the alveolar crest (Figure 17).
The third incision is made in the horizontal direction or perpendicular to the root, to separate the collar of gingival tissue from the alveolar bone (Figure 18). After this, root scraping and planing are performed. The flap is adjusted to protect all the bone tissue, and is sutured with in terproximal stitches (Figure 19).


Figure 15. Incisions for performing the modified Widman flap.


Figure 16. Initial incision of the flap made at a distance of 0.5 to 1.0 mm from the gingival margin (A); parallel to the long axis of the tooth (B).


Figure 17. Second intra-sulcular incision (A); separation of the soft tissue from the root surface (B).


Figure 18. Third incision made perpendicular to the root surface, and close to the bone crest (A); separation of the gingival collar from the alveolar bone (B).


Figure 19. Flap adjusted to completely cover the alveolar bone (A); side view showing the alveolar bone completely covered with soft tissue (B).
13 Flap for Preservation of Papillae
This technique was proposed by Takei et al. (1985) [18] and Cortellini et al. (1995,1999) [19, 20]. Changes have been made in the design of the flap for preservation of the papillae, enabling it to be used in regenerative procedures. It is a technique frequently used in the surgical treatment of anterior regions, in order to preserve the in terdental tissues for maximum coverage after the intervention [8].
13.1 Technique
Initially, intrasulcular incisions are made on the vestibular and proximal surfaces, but no incisions are made in the papillae (Figure 20).
After this, sulcular incisions are made on the lingual or palatal surfaces, in addition to making half-moon-shaped incisions in each interdental area (Figure 21).
Next, the full thickness of papillae is detached and then displaced to the vestibularregi on through the interdental space (Figure 22).
After the scaling and planing procedures, and the removal of the epithelium and granulation tissues from the pocket, the flap is repositioned, using quilting or plain sutures (Figure 23).

Figure 20. Intrasulcular incision made on the vestibular and proximal surfaces.

Figure 21. Half-moon-shaped incision made on the palatal or lingual surfaces of papillae.


Figure 22. Careful elevation of the papillae (A); papillae located on the vestibular surface, which was pushed with a blunt instrument (B).


Figure 23. Scaling and planing in flap with preservation of papillae (A); repositioning of papillae and plain sutures (B).
14 Apically Positioned Flap
The flap positioned apically may be denominated the apically repositioned flap, flap repositioned apically, or apically displaced flap [24]. The authors of the technique are Schluger (1949) [22], Friedman(1955) [23], and Oschenbein and Bohannan (1963, 1964) [24, 25]. Initially, a partial thickness flap was performed, but to conserve or increase the height of keratinized tissue, some authors have proposed the full thickness flap [26-28].The apically positioned flap is indicated for the following purposes: clinical crown augmentation, gingival augmentation, surgical exposure of impacted teeth or of those erupting from the alveolar mucosa, and peri-implant plasticsurgery [21] (Figure 24). Two techniques will be described as follows: one for full-thickness and the other for partial-thickness flaps.


Figure 24. Apically displaced flap in the second surgical stage of implants (A); maintenance or keratinized mucosa height augmentation (B).
15 Full-thickness Flap
One begins with an intrasulcularincision up to the bone (Figure 25).Next, two vertical relaxing incisions are made in the distal and mesial regions. Then the flap is displaced to expose bone, generally up to the mucogingival line. Partial thickness dissection is performed beyond the mucogingival line (Figure 26).The desired bone resection is performed (Figure 27).After placing the flap in the desired position, this flap is fixed by a system of vertical quilting sutures, which are fixed in the periosteum (Figure 28).

Figure 25. Initial intrasulcular incision.


Figure 26. Full thickness flap displacement up to the mucogingival junction (A); partial thicknessdissection after the mucogingival junction (B).

Figure 27. Osteotomy and osteoplasty.

Figure 28. Suture performed in the periosteum.
16 Partial-thickness Flap
A complete partial-thickness flap must be performed, right from the initial incision. If access to the bone is necessary, the zone is no longer periosteal. After apical displacement, the flap is fixed to the periosteum, which was kept in place; healing is by second intention, and there is formation of a new keratinized tissue (Figure 29). Two fundamental principles for obtaining good results are [21]:
- Fine dissection without perforation;
- Immobilization of the flap fixed to the periosteum.
The main disadvantages of the technique are the difficulty one has at the lingualand palatal surfaces, and the need for the surgeon to have a certain degree of skill to perform dissection and sutures in the periosteum. In spite of having be enused for a long time for the surgical treatment of periodontitis, the technique is now mainly used in preprosthetic surgery [11].


Figure 29. Partial thickness incision for performing apically displaced flap (A); suture of the flap in the apical position (B).
17 References
[1] McDonnell HT, Mills MP. Princípios e prática da cirurgia periodontal In: Rose LR, Mealey BL, Genco RJ, Cohen DW. Periodontia – medicina, cirurgia e implantes. São Paulo: Santos Editora, 2007:358–404.
[2] Cardoso RJA, Gonçalves EAN. Periodontia/cirurgia/cirurgia para implantes. São Paulo: Artes Médicas, 2002.
[3] Goldman HM. Gingivectomy. Oral Surg Oral Med Oral Pathol 1951;4:1136–1157.
[4] Hall WB. Periodontal preparation of the mouth for restoration. Dent Clin North Am 1980; 24:195–213.
[5] Duarte CA, Pereira CA, Castro MVM. Gengivectomia e Gengivoplastia. In: Duarte CA. Cirurgia periodontal pré-protética e estética, ed 2. São Paulo: Livraria Editora Santos, 2003:33–56.
[6] Takei HH, Carranza FA. Técnicas cirúrgicas gengivais. In: Newman MG, Takei HH, Klokkevold PR, Carranza FA. Carranza. Periodontia Clínica, ed 10. Rio de Janeiro: Elsevier, 2007:909–917.
[7] Tibbetts LS, Ammons Jr WF. Cirurgia periodontal ressectiva. In: Rose LR, Mealey BL, Genco RJ, Cohen DW. Periodontia – medicina, cirurgia e implantes. São Paulo: Santos Editora, 2007: 502–552.
[8] Wennström JL, Heijl L, Lindhe J. Periodontal surgery: access therapy. In: Lindhe J, Lang NP, Karring T. Clinical periodontology and implant dentistry, ed 5. Oxford: Blackwell Publishing, 2008:783–822.
[9] Corn H. Edentulous are pedicle grafts in mucogingival surgery. Periodontics 1964;2:229–242.
[10] Widman L. The operative treatment of pyorrhea alveolaris. A new surgical method. Sv. Tandl. Tidsk. (reviewed in British Dental Journal 1918;1:293).
[11] Neuman R. Die Alveolar-Pyorrhöe und ihre Behandlung, ed 3. Berlin: Herman Meusser, 1920.
[12] Kirkland O. The suppurative periodontal pus pocket; its treatment by the modified flap operation. J Am Dent Assoc 1931;18:1462–1470.
[13] Ramfjord SP, Nissle RR. The modified Widman flap. J Periodontol 1974;45:601–607.
[14] Ramfjord SP. Present status of the modified Widman flap procedure. J Periodontol 1977;48:558–565.
[15] Yukna RA, Bowers GM, Lawrence JJ, Fedi Jr PF. A clinical study of healing in humans following the excisional new attachment procedure. J Periodontol 1976;47:696–700. [16] Yukna RA. A clinical and histologic study of healing following the excisional new attachment procedure in rhesus monkeys. J Periodontol 1976;47:701–709.
[17] Fedi Jr.PR, Rosenfeld WJ. Excisional new attachment procedure. J Missouri Dent 1977;57:22–24.
[18] Takei HH, Han TJ, Carranza FA, Kennedy EB, Lekovic V. Flap technique for periodontal bone implants. Papilla preservation technique. J Periodontol 1985;56:204–210. 045 Chapter 01.
[19] Cortellini P, Pini Prato G, Tonetti M. The modified papilla preservation technique. A new surgical approach for interproximal regenerative procedures. J Periodontol 1995;66:261–266.
[20] Cortellini P, Pini Prato G, Tonetti, M. The simplified papilla preservation flap. A novel surgical approach for the management of soft tissues in regenerative procedures. Int J Periodont Rest Dent 1999;19, 589–599.
[21] Borghetti A, Monnet-Corti V. Retalho posicionado apicalmente. In: Borghetti A, MonnetCorti. Cirurgia plástica periodontal. Porto Alegre: Artmed, 2002: 181-186.
[22] Schluger S. Osseous resection. A basic principle in periodontal surgery. Oral Surg 1949;2:316–325.
[23] Friedman N. Periodontal osseous surgery: osteoplasty and ostectomy. J Periodontol 1955;26:257–269.
[24] Oschenbein C, Bohannan HM. Palatal approach to osseous surgery. I. Rationale. J Periodontol 1963;34:60–68.
[25] Oschenbein C, Bohannan HM. Palatal approach to osseous surgery. II. Clinical application. J Periodontol 1964;35:54–68.
[26] Nabers CL. Repositioning the attached gingiva. J Periodontol 1954;25:38–39.
[27] Ariaudo AA, Tyrell HA. Repositioning and increasing the zone of attached gingiva. J Periodontol 1957;28:106–110.
[28] Friedman N. Mucogingival surgery: the apically repositioned flap. J Periodontol 1962;33: 328–340.